Formatos de datos compatibles
QGIS utiliza la librería OGR para leer y escribir formatos de datos vectoriales, incluyendo formatos de archivos shape de ESRI, MapInfo y MicroStation, base de datos AutoCAD DXF, PostGIS, SpatiaLite, Oracle Spatial y MSSQL Spatial, y muchos más. La implementación de vector de GRASS y PostgreSQL es suministrado por complementos de proveedor de datos nativo de QGIS. Los datos vectoriales también se pueden cargar en modo lectura de archivos zip y gzip en QGIS. A la fecha de este documento, 69 formatos vectoriales son reconocidos por la librería OGR (vea OGR-SOFTWARE-SUITE in Referencias bibliográficas y web). La lista completa esta disponible en http://www.gdal.org/ogr/ogr_formats.html.
Nota
Not all of the listed formats may work in QGIS for various reasons. For
example, some require external commercial libraries, or the GDAL/OGR
installation of your OS may not have been built to support the format you
want to use. Only those formats that have been well tested will appear in
the list of file types when loading a vector into QGIS. Other untested
formats can be loaded by selecting *.*.
Trabajar con datos vectoriales GRASS se describe en la sección Integracion GRASS SIG.
This section describes how to work with several common formats: ESRI shapefiles, PostGIS layers, SpatiaLite layers, OpenStreetMap vectors, and Comma Separated data (CSV). Many of the features available in QGIS work the same, regardless of the vector data source. This is by design, and it includes the identify, select, labelling and attributes functions.
Nota
QGIS supports (multi)point, (multi)line, (multi)polygon, CircularString, CompoundCurve, CurvePolygon, MultiCurve, MultiSurface feature types, all with Z and/or M values.
You should note also that some driver doesn’t support some of these feature types like CircularString, CompoundCurve, CurvePolygon, MultiCurve, MultiSurface feature type. QGIS will convert them to (multi)polygon feature.
Cargando una capa desde archivo
 To load a layer from a file (like a Shapefile, a Mapinfo or a dxf
layer), click on the Add Vector Layer toolbar button; or
type
To load a layer from a file (like a Shapefile, a Mapinfo or a dxf
layer), click on the Add Vector Layer toolbar button; or
type Ctrl+Shift+V. This will bring up a new window (see
figure_vector_1).
Figure Vector 1:
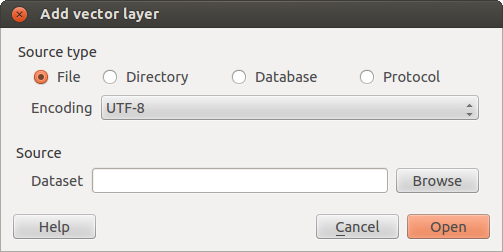
Diálogo Adicionar Capa Vectorial
From the available options check  File. Click on
[Browse]. That will bring up a standard open file dialog
(see figure_vector_2), which allows you to navigate the file system and load a
shapefile or other supported data source. The selection box Filter
File. Click on
[Browse]. That will bring up a standard open file dialog
(see figure_vector_2), which allows you to navigate the file system and load a
shapefile or other supported data source. The selection box Filter
 allows you to preselect some OGR-supported file formats.
También puede seleccionar la codificación para el archivo si lo desea.
Figure Vector 2:
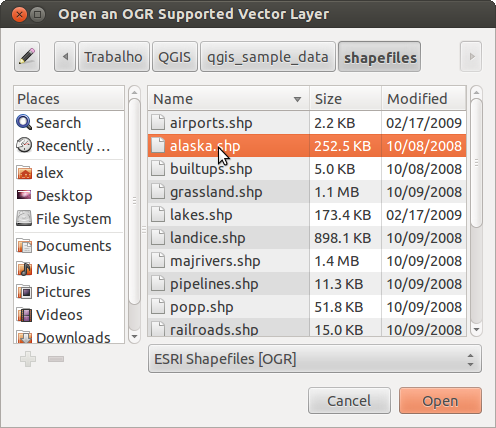
Abre un Diálogo de Capa Vectorial Soportada por OGR
Selecting a file from the list and clicking [Open] loads it into QGIS.
Figure_vector_3 shows QGIS after loading the alaska.shp file.
Figure Vector 3:
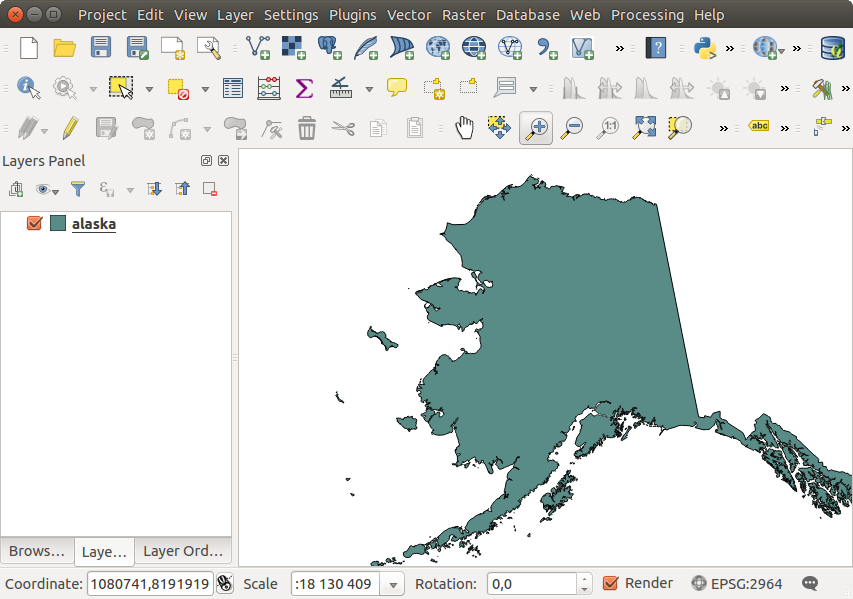
QGIS con archivo shape de Alaska cargado
Truco
Capa de colores
Cuando se añade una capa al mapa, se asigna un color al azar. Cuando se añade más de una capa a la vez, diferentes colores se asignan a cada capa.
Once a file is loaded, you can zoom around it using the map navigation tools. To change the style of a layer, open the Layer Properties dialog by double clicking on the layer name or by right-clicking on the name in the legend and choosing Properties from the context menu. See section Estilo de Menu for more information on setting symbology of vector layers.
Truco
capa de cargada y se proyecta desde unidades externas montadas en OS X
En sistemas operativos X, unidades portátiles que se montan al lado del disco duro principal no aparecen como se esperaba en Archivo ‣ Abrir Proyecto. Estamos trabajando en una diálogo de abrir/guardar más nativo al SO X para solucionar este problema. Como solución alternativa, puede escribir /Volumes en la caja Nombre del archivo y presionar Enter. A continuación, se puede desplazar a unidades externas y los montajes de la red.
Nota
DXF files containing several geometry types (point, line and/or polygon), the name of the layer will be made from <filename.dxf> entities <geometry type>.
Nota
You can also drag and drop the file(s) into the Layers Panel from either the files browser or the QGIS Browser panel. If the layer contains several geometry types, a new windows will ask you to select the sublayer. This often occurs with GPX, Mapinfo or DXF files format.
Loading specific directory based layer
To load some specific format like ArcInfo Binary Coverage, UK.
National Transfer Format, as well as the raw TIGER format of the US Census
Bureau or OpenfileGDB, click on the Add Vector Layer
toolbar button or press Ctrl+Shift+V to open the
Add Vector Layer dialog. Select
Directory as Source type. Change the file type filter
Files of type to the format you want to open, for
example ‘Arc/Info Binary Coverage’. Navigate to the directory that contains the
coverage file or the file, and select it.
Archivos shape de ESRI
The ESRI shapefile is still one of the most used vector file format in QGIS. However, this file format has some limitation that some other file format have not (like Geopackage, spatialite). Support is provided by the OGR Simple Feature Library (http://www.gdal.org/ogr/).
Un archivo shape actualmente consiste de varios archivos. Los siguientes tres son necesarios:
archivo
.shpcontiene las geometrías de los objetos espacialesarchivo
.dbfcontiene los atributos en formato dBasearchivo del índice
.shx
Los archivos shape también incluyen un archivo con un sufijo .prj, que contiene la información de la proyección. Si bien es muy útil tener un archivo de proyección. no es obligatorio. Un conjunto de datos de archivo shape puede contener archivos adicionales. Para mayor detalle, consulte la especificación técnica de ESRI en http://www.esri.com/library/whitepapers/pdfs/shapefile.pdf.
Improving Performance for Shapefiles
Para mejorar el desempeño de dibujo de un archivo shape, se debe crear un índice espacial. Un índice espacial mejorará la velocidad del zum y desplazamiento. Los indices espaciales utilizados por QGIS tienen una extensión .qix.
Utilice estos pasos para crear un índice:
- Load a shapefile by clicking on the Add Vector Layer
toolbar button or pressing
Ctrl+Shift+V. Abrir el diálogo Propiedades de la capa haciendo doble clic sobre el nombre del archivo shape en la leyenda o haciendo clic derecho y elegir Propiedades del menú contextual.
En la pestaña General, hacer clic sobre el botón [Crear Índice Espacial].
Problem loading a shape .prj file
If you load a shapefile with a .prj file and QGIS is not able to read the
coordinate reference system from that file, you will need to define the proper
projection manually within the General tab of the
Layer Properties dialog of the layer by clicking the
[Specify...] button. This is due to the fact that .prj files
often do not provide the complete projection parameters as used in QGIS and
listed in the CRS dialog.
For the same reason, if you create a new shapefile with QGIS, two different
projection files are created: a .prj file with limited projection
parameters, compatible with ESRI software, and a .qpj file, providing
the complete parameters of the used CRS. Whenever QGIS finds a .qpj
file, it will be used instead of the .prj.
Archivos de Texto delimitado
Los datos tabulares son muy comunes y un formato extensamente utilizado debido a su simplicidad y legibilidad – los datos pueden ser vistos y editados incluso en un editor de texto plano. un archivo de texto delimitado es una tabla de atributos con cada columna separada por un caracter definido y cada fila separada por un salto de línea. La primer fila normalmente contiene los nombres de columnas. Un tipo de campo de archivo de texto delimitado es un CSV (Valores separados por comas), con cada columna separada por una coma.
Tales archivos de datos también pueden contener información posicional en dos formas principales:
Como punto de coordenadas en columnas separadas
Como representación de geometría well-known text (WKT)
QGIS allows you to load a delimited text file as a layer or ordinal table. But first check that the file meets the following requirements:
El archivo debe tener una fila de encabezado delimitado de nombre de campos. Esto debe ser la primer línea en el archivo de texto.
La fila del encabezado debe contener campo(s) con definición geometría. Estos campo(s) pueden tener cualquier nombre.
La coordenada X y Y (si la geometría se define por coordenadas) se debe especificarse como números. El sistema de coordenadas no es importante.
As an example of a valid text file, we import the elevation point data file
elevp.csv that comes with the QGIS sample dataset (see section
Datos de ejemplo):
X;Y;ELEV
-300120;7689960;13
-654360;7562040;52
1640;7512840;3
[...]
Algunos elementos a tener en cuenta sobre el archivo de texto:
El archivo de texto de ejemplo utiliza
;(punto y coma) como delimitador. Cualquier carácter se puede utilizar para delimitar los campos.La primer fila es el encabezado. Este contiene los campos
X,YyELEV.Sin comillas (
") se utilizan para delimitar los campos de texto.Las coordenadas X están contenidas en el campo
X.La coordenada Y esta contenida en el campo
Y.
Others valuable informations for advanced users
Features with curved geometries (CircularString, CurvePolygon and CompoundCurve) are supported. Here are three examples of such geometry types as a delimited text with WKT geometries:
Label;WKT_geom
CircularString;CIRCULARSTRING(268 415,227 505,227 406)
CurvePolygon;CURVEPOLYGON(CIRCULARSTRING(1 3, 3 5, 4 7, 7 3, 1 3))
CompoundCurve;COMPOUNDCURVE((5 3, 5 13), CIRCULARSTRING(5 13, 7 15,
  9 13), (9 13, 9 3), CIRCULARSTRING(9 3, 7 1, 5 3))
Delimited Text supports also Z and M coordinates in geometries:
LINESTRINGM(10.0 20.0 30.0, 11.0 21.0 31.0)
Cargar un archivo de texto delimitado
Click the toolbar icon  Add Delimited Text Layer in the
Manage layers toolbar to open the Create a Layer from a
Delimited Text File dialog, as shown in figure_delimited_text_1.
Add Delimited Text Layer in the
Manage layers toolbar to open the Create a Layer from a
Delimited Text File dialog, as shown in figure_delimited_text_1.
Figure Delimited Text 1:
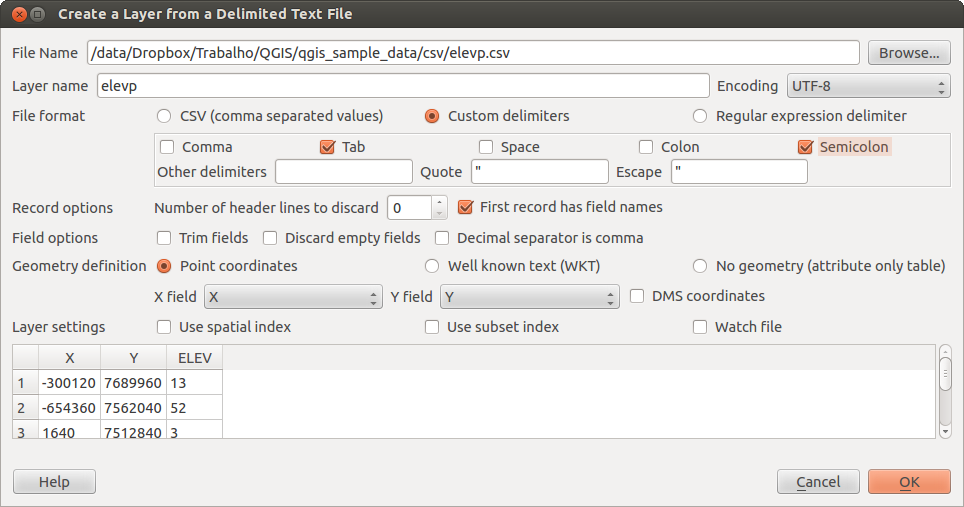
Delimited Text Dialog
First, select the file to import (e.g., qgis_sample_data/csv/elevp.csv)
by clicking on the [Browse] button. Once the file is selected, QGIS
attempts to parse the file with the most recently used delimiter. To enable QGIS to properly parse the
file, it is important to select the correct delimiter. You can specify a
delimiter by activating Custom delimiters, or by activating
Regular expression delimiter and entering
text into the Expression field. For example, to
change the delimiter to tab, use \t (this is a regular expression for the
tab character).
Once the file is parsed, set Geometry definition to
Point coordinates and choose the X and Y
fields from the dropdown lists. If the coordinates are defined as
degrees/minutes/seconds, activate the  DMS coordinates
checkbox.
DMS coordinates
checkbox.
Finally, enter a layer name (e.g., elevp), as shown in
figure_delimited_text_1. To add the layer to the map, click [OK]. The
delimited text file now behaves as any other map layer in QGIS.
También hay una opción de ayuda que le permite recortar espacios iniciales y finales de los campos — Recortar campos. Además, es posible Descartar campos vacíos. Si es necesario,se puede forzar una coma para ser el separador decimal activando El separador decimal es la coma.
Si la información esta representada por WKT, active la opción Texto bien conocido (WKT) y seleccione el campo con la definición WKT para el objeto punto, línea o polígono. Si el archivo contiene datos no espaciales, active Ninguna geometría (tabla solo de atributos) y se carga como una tabla ordinal.
Additionally, you can enable:
- Utilizar índice espacial para mejorar el rendimiento de la visualización y selección de objetos espacialmente.
- Utilizar índice de subconjunto.
- Watch file to watch for changes to the file by other
applications while QGIS is running.
Datos OpenStreetMap
In recent years, the OpenStreetMap project has gained popularity because in many countries no free geodata such as digital road maps are available. The objective of the OSM project is to create a free editable map of the world from GPS data, aerial photography or local knowledge. To support this objective, QGIS provides support for OSM data.
Cargar vectoriales OpenStreetMap
QGIS integrates OpenStreetMap import as a core functionality.
Para conectar al servidor OSM y descargar datos, abra el menú Vectorial ‣ Openstreetmap ‣ Descargar datos.... Se puede saltar este paso si se ha obtenido un archivo XML
.osmmediante JOSM, Overpass API o cualquier otra fuente.El menú Vectorial ‣ Openstreetmap ‣ Importar topología a partir de XML convertirá su archivo
.osmen una base de datos SpatiaLite y cree una conexión de base de datos correspondiente.- The menu Vector ‣ Openstreetmap ‣ Export topology to
SpatiaLite then allows you to open the database connection, select the type
of data you want (points, lines, or polygons) and choose tags to import.
This creates a SpatiaLite geometry layer that you can add to your
project by clicking on the
 Add SpatiaLite Layer toolbar button or by selecting the
Add SpatiaLite Layer... option
from the Layer menu (see section Capas SpatiaLite).
Add SpatiaLite Layer toolbar button or by selecting the
Add SpatiaLite Layer... option
from the Layer menu (see section Capas SpatiaLite).
Capas PostGIS
PostGIS layers are stored in a PostgreSQL database. The advantages of PostGIS are the spatial indexing, filtering and query capabilities it provides. Using PostGIS, vector functions such as select and identify work more accurately than they do with OGR layers in QGIS.
Crear una conexión almacenada
 The first time you use a PostGIS data source, you must
create a connection to the PostgreSQL database that contains the data. Begin by
clicking on the Add PostGIS Layer toolbar
button, selecting the Add PostGIS Layer...
option from the Layer menu, or typing
The first time you use a PostGIS data source, you must
create a connection to the PostgreSQL database that contains the data. Begin by
clicking on the Add PostGIS Layer toolbar
button, selecting the Add PostGIS Layer...
option from the Layer menu, or typing Ctrl+Shift+D. You
can also open the Add Vector Layer dialog and select
Database. The Add PostGIS Table(s)
dialog will be displayed. To access the connection manager, click on the
[New] button to display the Create a New PostGIS Connection
dialog. The parameters required for a connection are:
Nombre: Un nombre para esta conexión. Este puede ser el mismo como la Base de datos
- Service: Service parameter to be used alternatively to hostname/port (and
potentially database). This can be defined in
pg_service.conf. Check the Service connection file section for more details. - Host: Name of the database host. This must be a resolvable host name such as would be used to open a telnet connection or ping the host. If the database is on the same computer as QGIS, simply enter ‘localhost’ here.
Puerto Número de puerto al servidor de base de datos PostgreSQL escucha en. El puerto por defecto es 5432.
Base de datos: Nombre de la base de datos.
SSL mode: Como la conexión SSL se negociará con el servidor. Tenga en cuenta que en masivas aceleraciones en la representación capas PostGIS se puede lograr mediante la desactivación de SSL en el editor de conexión. La siguiente opción esta disponible:
Deshabilitar: Sólo trata una conexión SSL cifrada.
Permitir: Trata una conexión no SSL. Si eso falla, trata una SSL.
Preferir (por defecto): Trata una conexión SSL. Si eso falla, intenta una no SSL.
Requerir: Sólo intenta una conexión SSL.
Nombre de usuario: Nombre de usuario para iniciar sesión en la base de datos.
Contraseña: Contraseña utilizada con Nombre de usuario para conectarse a la base de datos.
Opcionalmente se pueden activar las siguientes casillas:
- Guardar nombre de usuario
- Guardar contraseña
- Sólo busque en la tabla geometry_columns
- No se resuelve el tipo de columnas sin restricción (GEOMETRY)
- buscar sólo en el esquema ‘público’
- Listar también tablas sin geometría
- Utilizar metadatos de tablas estimados
Una vez que todos los parámetros y opciones estén establecidos, se puede probar la conexión al hacer clic en el botón [Probar conexión].
Truco
Use estimated table metadata to speed up operations
When initializing layers, various queries may be needed to establish the characteristics of the geometries stored in the database table. When the Use estimated table metadata option is checked, these queries examine only a sample of the rows and use the table statistics, rather than the entire table. This can drastically speed up operations on large datasets, but may result in incorrect characterization of layers (eg. the feature count of filtered layers will not be accurately determined) and may even cause strange behaviour in case columns that are supposed to be unique actually are not.
Cargar una capa PostGIS
Una vez que se tiene una o más conexiones definidas, se pueden cargar capas desde la base de datos PostgreSQL. Por supuesto, esto requiere tener datos en PostgreSQL. Consulte la sección Importar datos a PostgreSQL para una discusión sobre la importación de datos a la base de datos.
Para cargar una capa de PostGIS, realizar los siguientes pasos:
Si el diálogo Añadir capas PostGIS ya no abre, seleccione la opción
Añadir capa PostGIS... del menú Capa o escribiendo Ctrl+Shift+Dpara abrir el diálogo.Elija la conexión de la lista desplegable y haga clic en [Conectar].
Seleccione o deseleccione
Listar también las tablas sin geometría.Opcionalmente, utilice algunas
Opciones de búsqueda para definir que objetos espaciales se deben cargar desde la capa, o utilice el botón [Construir consulta] al iniciar el diálogo Constructor de consultas.Encuentre las capa(s) que desee añadir en la lista de capas disponibles.
Selecciónelo haciendo clic sobre él. Se puede seleccionar múltiples capas manteniendo pulsado la tecla
Shiftmientras hace clic. Consulte la sección Constructor de Consulta para información sobre utilizar el constructor de consultas de PostgreSQL para definir aún más la capa.Haga clic en el botón [Añadir] para agregar la capa al mapa.
Truco
Capas PostGIS
Normally, a PostGIS layer is defined by an entry in the geometry_columns table. From version 0.9.0 on, QGIS can load layers that do not have an entry in the geometry_columns table. This includes both tables and views. Defining a spatial view provides a powerful means to visualize your data. Refer to your PostgreSQL manual for information on creating views.
Service connection file
The service connection file allows PostgreSQL connection parameters to be associated with a single service name. That service name can then be specified by a client and the associated settings will be used.
It’s called .pg_service.conf under *nix systems (GNU/Linux, macOS etc.) and
pg_service.conf on Windows.
El archivo de servicio se parece a esto:
[water_service]
host=192.168.0.45
port=5433
dbname=gisdb
user=paul
password=paulspass

[wastewater_service]
host=dbserver.com
dbname=water
user=waterpass
Nota
There are two services in the above example: water_service
and wastewater_service. You can use these to connect from QGIS,
pgAdmin etc. by specifying only the name of the service you want to
connect to (without the enclosing brackets).
If you want to use the service with psql you need to do something
like export PGSERVICE=water_service before doing your psql commands.
Nota
You can find all the parameters here
Nota
If you don’t want to save the passwords in the service file you can use the .pg_pass option.
On *nix operating systems (GNU/Linux, macOS etc.) you can save the
.pg_service.conf file in the user’s home directory and
the PostgreSQL clients will automatically be aware of it.
For example, if the logged user is web, .pg_service.conf should
be saved in the /home/web/ directory in order to directly work (without
specifying any other environment variables).
You can specify the location of the service file by creating a PGSERVICEFILE
environment variable (e.g. run the export PGSERVICEFILE=/home/web/.pg_service.conf
command under your *nix OS to temporarily set the PGSERVICEFILE variable)
You can also make the service file available system-wide (all users) either by
placing it at pg_config --sysconfdir``**/.pg_service.conf** or by adding the
``PGSYSCONFDIR environment variable to specify the directory containing
the service file. If service definitions with the same name exist in the user
and the system file, the user file takes precedence.
Advertencia
There are some caveats under Windows:
- The service file should be saved as
pg_service.confand not as.pg_service.conf. - The service file should be saved in Unix format in order to work.
One way to do it is to open it with Notepad++
and
Edit -> EOL Conversion -> UNIX Format -> File save. - After adding an environment variable you may also need to restart the computer.
Algunos detalles acerca de las capas PostgreSQL
This section contains some details on how QGIS accesses PostgreSQL layers. Most of the time, QGIS should simply provide you with a list of database tables that can be loaded, and it will load them on request. However, if you have trouble loading a PostgreSQL table into QGIS, the information below may help you understand any QGIS messages and give you direction on changing the PostgreSQL table or view definition to allow QGIS to load it.
QGIS requires that PostgreSQL layers contain a column that can be used as a unique key for the layer. For tables, this usually means that the table needs a primary key, or a column with a unique constraint on it. In QGIS, this column needs to be of type int4 (an integer of size 4 bytes). Alternatively, the ctid column can be used as primary key. If a table lacks these items, the oid column will be used instead. Performance will be improved if the column is indexed (note that primary keys are automatically indexed in PostgreSQL).
Si la capa PostgreSQL es una vista, existe el mismo requisito, pero las vistas no tienen llaves primarias o columnas con restricciones únicas en ellos. Se tiene que definir un campo de llave primaria (tiene que ser entero) en el diálogo de QGIS antes que pueda cargar la vista. Si no existe una columna adecuada en la vista, QGIS no cargará la capa. Si esto ocurre, la solución es modificar la vista para que incluya una columna adecuada (un tipo de dato entero y o bien una llave primaria con una restricción única, preferentemente indexada).
QGIS ofrece una casilla Seleccionar id que esta activado por defecto. Esta opción obtiene los id’s sin los atributos que es más rápido que la mayoría de los casos. Puede tener sentido para desactivar esta opción cuando usa vistas costosas.
Truco
Respaldo de base de datos PostGIS con capas guardadas por QGIS
If you want to make a backup of your PostGIS database using the pg_dump and
pg_restore commands, and the default layer styles as saved by QGIS fail to
restore afterwards, you need to set the XML option to DOCUMENT and the
restore will work.
QGIS allows to filter features already on server side. Check the
Execute expressions on postgres server-side if
possible (Experimental) checkbox to do so. Only supported expressions will be
sent to the database. Expressions using unsupported operators or functions will
gracefully fallback to local evaluation.
Importar datos a PostgreSQL
Data can be imported into PostgreSQL/PostGIS using several tools, including the DB Manager plugin and the command line tools shp2pgsql and ogr2ogr.
Administrador BBDD
QGIS comes with a core plugin named  DB Manager. It can
be used to load shapefiles and other data formats, and it includes support for
schemas. See section Complemento administrador de BBDD for more information.
DB Manager. It can
be used to load shapefiles and other data formats, and it includes support for
schemas. See section Complemento administrador de BBDD for more information.
shp2pgsql
PostGIS incluye una utilidad llamada shp2pgsql que puede ser utilizada para importar archivos shape a la base de datos PostGIS habilitada. Por ejemplo, importar un archivo shape llamado lakes.shp en la base de datos PostgreSQL llamado gis_data, utilice el siguiente comando:
shp2pgsql -s 2964 lakes.shp lakes_new | psql gis_data
Esto crea una nueva capa llamada lakes_new en la base de datos gis_data. La nueva capa tendrá un identificador de referencia espacial (SRID) de 2964. Vea la sección Trabajar con Proyecciones para más información en sistema de referencia espacial y proyecciones.
Truco
Exportar conjunto de datos de PostGIS
Como la herramienta de importar shp2pgsql, también hay una herramienta para exportar conjuntos de datos PostGIS como archivos shape: pgsql2shp. Esta es enviada dentro de su distribución PostGIS.
ogr2ogr
Además de shp2pgsql y Administrador de BBDD, hay otra herramienta para alimentar de datos geográficos a PostGIS: ogr2ogr. Esto es parte de su instalación GDAL.
Para importar un archivo shape a PostGIS, realice lo siguiente:
ogr2ogr -f "PostgreSQL" PG:"dbname=postgis host=myhost.de user=postgres
password=topsecret" alaska.shp
Esto importará el archivo shape alaska.shp a la base de datos de PostGIS postgis utilizando el usuario postgres con la contraseña topsecret del servidor local myhost.de.
Tenga en cuenta que OGR se debe contruir con PostgreSQL para reconocer PostGIS. Se debe verificar esto escribiendo (en  )
)
ogrinfo --formats | grep -i post
Si prefiere utilizar el comando de PostgreSQL COPY en lugar del método predeterminado INSERT INTO, se puede exportar la siguiente variable de entorno (al menos disponible en y  ):
):
export PG_USE_COPY=YES
ogr2ogr no crea índices espaciales como lo hace shp2pgsl. Se deben crear manualmente, utilizando el comando SQL normal CREATE INDEX después como un paso extra (como se describe en la siguiente sección Mejorar el desempeño).
Mejorar el desempeño
Recuperar objetos espaciales de una base de datos PostgreSQL puede llevar mucho tiempo, especialmente sobre una red. Se puede mejorar el rendimiento de dibujo de las capas de PostgreSQL asegurando un Índice espacial PostGIS existente en cada capa en la base de datos. PostGIS reconoce la creación de un Índice GiST (Generalized Search Tree) para acelerar las búsquedas de los datos espaciales (GiST índice de información se toma de la documentación de PostGIS disponible en http://postgis.net).
Truco
You can use the DBManager to create an index to your layer. You should first select the layer and click on Table > Edit table, go to Indexes tab and click on [Add spatial index].
La sintaxis para crear un índice GiST es:
CREATE INDEX [indexname] ON [tablename]
  USING GIST ( [geometryfield] GIST_GEOMETRY_OPS );
Tenga en cuenta que para tablas grandes, crear el índice puede tomar un largo tiempo. Una vez que el índice es creado, se debe realizar un VACUUM ANALYZE. Vea la documentación de PostGIS (POSTGIS-PROJECT Referencias bibliográficas y web) para mayor información.
El siguiente es un ejemplo de cómo crear un índice GiST:
gsherman@madison:~/current$ psql gis_data
Welcome to psql 8.3.0, the PostgreSQL interactive terminal.

Type:  \copyright for distribution terms
       \h for help with SQL commands
       \? for help with psql commands
       \g or terminate with semicolon to execute query
       \q to quit

gis_data=# CREATE INDEX sidx_alaska_lakes ON alaska_lakes
gis_data-# USING GIST (the_geom GIST_GEOMETRY_OPS);
CREATE INDEX
gis_data=# VACUUM ANALYZE alaska_lakes;
VACUUM
gis_data=# \q
gsherman@madison:~/current$
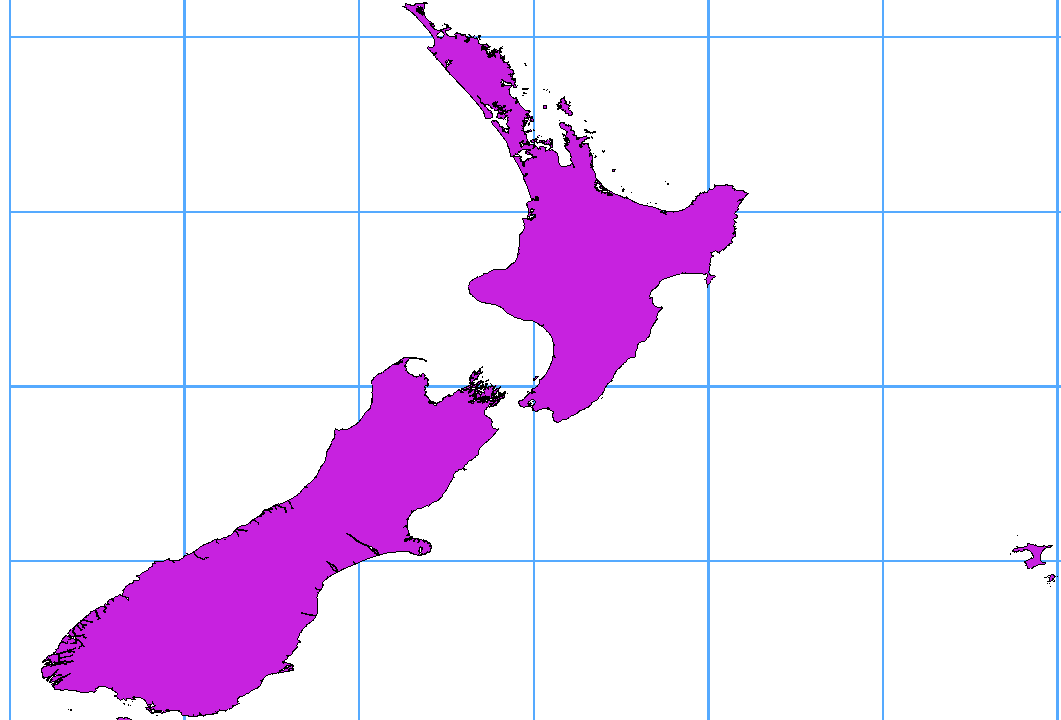
Las capas vectoriales que crusan 180° de longitud
Muchos paquetes SIG no envuelven mapas vectoriales con sistemas de referencia geográfica (lat/lon) Cruzar la línea de longitud de 180 grados (http://postgis.refractions.net/documentation/manual-2.0/ST_Shift_Longitude.html). Como resultado, si abrimos cada mapa en QGIS, veremos dos lejos, distintas ubicaciones, que deberían aparecer cerca uno del otro. En Figure_vector_4, el punto minúsculo en el extremo izquierdo del área del mapa (Chatham Islands) debe estar dentro de la cuadrícula, a la derecha de las islas principales de Nueva Zelanda.
Figure Vector 4:

El mapa en lat/long cruza los 180° de la línea de longitud
Una solución temporal es transformar los valores de longitud utilizando PostGIS y la función ST_Shift_Longitude. Esta función lee todos los puntos/vértices en todos el componentes de todos los objetos espaciales de una geometría, y si la coordenada longitud es < 0°, se agregan 360°. El resultado es un 0° - 360° versión de los datos que se van a representar en 180° de un mapa centrico.
Figure Vector 5:
Cruzar 180° de longitud aplicando la función ST_Shift_Longitude
Uso
Importar datos a PostGIS (Importar datos a PostgreSQL) utilizando, por ejemplo, el complemento Administrador de BBDD.
Utilizar la interfaz de línea de comandos de PostGIS para emitir el siguiente comando (en este ejemplo, “TABLE” es el nombre actual de su tabla de PostGIS):
gis_data=# update TABLE set the_geom=ST_Shift_Longitude(the_geom);Si todo fue bien, debe recibir una confirmación acerca del número de objetos espaciales que se actualizaron. Entonces podrá cargar el mapa y ver la diferencia (Figure_vector_5).
Capas SpatiaLite
The first time you load data from a SpatiaLite
database, begin by clicking on the
Add SpatiaLite Layer toolbar button, or by selecting the
Add SpatiaLite Layer... option
from the Layer menu, or by typing Ctrl+Shift+L.
This will bring up a window that will allow you either to connect to a
SpatiaLite database already known to QGIS, which you can choose from the
drop-down menu, or to define a new connection to a new database. To define a
new connection, click on [New] and use the file browser to point to
your SpatiaLite database, which is a file with a .sqlite extension.
Si desea guardar una capa vectorial a un formato SpatiaLite, se puede hacer esto al hacer clic derecho sobre la capa en la leyenda. A continuación, haga clic sobre Guardar como.., definir el nombre del archivo de salida, y seleccionar ‘SpatiaLite’ como formato y el SRC. También se puede seleccionar ‘SQLite’ como formato y entonces añadir SPATIALITE=YES en el campo de opcion de creación de fuente de datos. Esto le dice a OGR crear una base de datos SpatiaLite. También vea http://www.gdal.org/ogr/drv_sqlite.html.
QGIS también soporta vistas editables en SpatiaLite.
Crear una nueva capa SpatiaLite
Si se desea crear una nueva capa SpatiaLite, por favor consulte la sección Crear una nueva capa SpatiaLite.
Truco
Complemento de Administración de datos SpatiaLite
For SpatiaLite data management, you can also use several Python plugins: QSpatiaLite, SpatiaLite Manager or DB Manager (core plugin, recommended). If necessary, they can be downloaded and installed with the Plugin Installer.
Capas MSSQL Spatial
 QGIS también proporciona ayuda nativa de MS SQL. La primera vez se cargan los datos espaciales a MSSQL, inicie haciendo clic en el botón Añadir capa espacial MSSQL de la barra de herramientas o seleccionando la opción Añadir capa espacial MSSQL... del menú Capa, o al pulsar
 Ctrl+Shift+M.
Capas Oracle Spatial
The spatial features in Oracle Spatial aid users in managing geographic and location data in a native type within an Oracle database. QGIS now has support for such layers.
Crear una conexión almacenada
 The first time you use an Oracle Spatial data source,
you must create a connection to the database that contains the data. Begin by
clicking on the Add Oracle Spatial Layer toolbar
button, selecting the Add Oracle
Spatial Layer... option from the Layer menu, or typing
The first time you use an Oracle Spatial data source,
you must create a connection to the database that contains the data. Begin by
clicking on the Add Oracle Spatial Layer toolbar
button, selecting the Add Oracle
Spatial Layer... option from the Layer menu, or typing
Ctrl+Shift+O. To access the connection manager, click on the [New]
button to display the Create a New Oracle Spatial Connection dialog.
The parameters required for a connection are:
Nombre: Un nombre para esta conexión. Puede ser el mismo como la Base de datos
Base de datos: SID o SERVICE_NAME de la instancia de Oracle.
- Host: Name of the database host. This must be a resolvable host name such as would be used to open a telnet connection or ping the host. If the database is on the same computer as QGIS, simply enter ‘localhost’ here.
Puerto: Número de puerto al servidor de base de datos en donde escucha Oracle. El puerto predeterminado es 1521.
Nombre de usuario: Nombre de usuario para iniciar sesión en la base de datos.
Contraseña: Contraseña utilizada con Nombre de usuario para conectarse a la base de datos.
Opcionalmente, se pueden activar las siguientes casillas:
- Guardar nombre de usuario Indicar si guarda el nombre de usuario de la base de datos en la configuración de la conexión.
- Guardar contraseña Indicar si se guarda la contraseña de la base de datos en la configuración de la conexión.
- Buscar sólo en la tabla de datos meta restinge las tablas mostradas a esos que están en la vista all_sdo_geom_metadata. Esto puede acelerar la visualización inicial de tablas espaciales.
- Buscar solo tablas de usuarios Cuando busca tablas espaciales, restringe la búsqueda a tablas que son propiedad del usuario.
- Listar también tablas sin geometría Indica que las tablas sin geometría también se listen de forma predeterminada.
- Utilizar metadatos de tabla estimados Cuando la capa se configura, varios metadatos son requeridos para la tabla Oracle. Esto incluye información como el total de filas de la tabla, tipo de geometria y extensión espacial de los datos en la columna geometría. Si la tabla contiene un gran número de filas, la determinación de esto metadatos puede llevar mucho tiempo. Al activar esta opción, las siguientes operaciones de metadatos de tabla rápida se hacen: Total de filas se determina de
all_tables.num_rows. Extensión de la tabla siempre se determina con la función SDO_TUNE.EXTENTS_OF, incluso si un filtro de capa es aplicado. La tabla de geometría se determina de los primeros 100 filas de geometría no nula en la tabla. - Sólo tipos de geometría existente Sólo listar los tipos de geometría existente y no ofrecer añadir otros.
Advertencia
En la pestaña Autentificación mantendrá credenciales sin proteger en la configuración de conexión. Esas credenciales serán visibles si, por ejemplo comparte el archivo del proyecto con alguien. Por lo tanto es aconsejable guardar sus credenciales en una Configuración de autentificación en lugar (pestaña de configuraciones). Vea ref:authentication_index para mayor detalle.
Una vez que todos los parámetros y opciones estén establecidos, se puede probar la conexión al hacer clic en el botón [Probar conexión].
Truco
Configuración de usuario QGIS User y seguridad
Depending on your computing environment, storing passwords in your QGIS settings may be a security risk. Passwords are saved in clear text in the system configuration and in the project files! Your customized settings for QGIS are stored based on the operating system:
- Los ajustes son almacenados en su directorio de inicio en
~/.qgis2.  Los ajustes son almacenados en el registro.
Cargar una capa Oracle Spatial
Once you have one or more connections defined, you can
load layers from the Oracle database. Of course, this requires having data in
Oracle.
Para cargar una capa de Oracle Spatial, realice los siguientes pasos:
- If the Add Oracle Spatial layers dialog is not already open,
click on the Add Oracle Spatial Layer toolbar
button.
Elija la conexión de la lista desplegable y haga clic en [Conectar].
Seleccione o deseleccione
Listar también las tablas sin geometría.Opcionalmente, utilice algunos
Opciones de búsqueda para definir que objetos espaciales cargar de la capa o utilice el botón [Construir consulta] para iniciar el diálogo Constructor de consulta.Encuentre las capa(s) que desee añadir en la lista de capas disponibles.
Seleccionelo haciendo clic sobre él. Se puede seleccionar múltiples capas manteniendo pulsado la tecla
Shiftmientras hace clic. Vea la sección Constructor de Consulta para más información sobre el uso del Constructor de consultas de Oracle para definir aún más la capa.Haga clic en el botón [Añadir] para agregar la capa al mapa.
Truco
Capas Oracle Spatial
Normalmente, una capa espacial de Oracle se define por una entrada en la tabla USER_SDO_METADATA.